
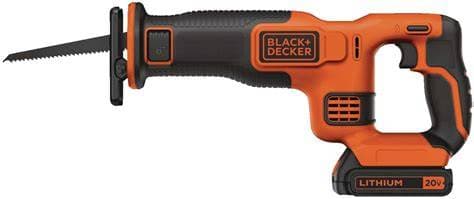
카테고리: Power Tools

브랜드: BLACK+DECKER

모델: BDCR20C

BLACK+DECKER BDCR20C 수리 매뉴얼

BLACK+DECKER BDCR20C 20V MAX 왕복톱에 대한 소유자 수준 수리 매뉴얼로, 문제 해결, 부품 식별, 안전 지침 및 단계별 수리 지침을 포함합니다.

$39.99

마지막 업데이트 Jul 31, 2026, 11:06 AM

Manual information

이 매뉴얼에 대하여

BLACK+DECKER BDCR20C 20V MAX 왕복톱에 대한 소유자 수준 수리 매뉴얼로, 문제 해결, 부품 식별, 안전 지침 및 단계별 수리 지침을 포함합니다.

0% Reported Successful Repair

Price

$39.99

전체 매뉴얼 포함 내용

  • root cause analysis
  • tools needed
  • step-by-step repair procedure
  • diagrams
  • exploded views
  • post-repair checks

목차 미리보기

  • BLACK+DECKER BDCR20C 20V MAX* 왕복톱
  • Black+decker Bdcr20c
  • 가장 중요한 여섯 가지
  • 이 모델이 실제로 갖춘 것
  • 표시기 및 신호 지도
  • 모델 개정 경고
  • 전원 및 절단 경로
  • 일반 사용 순서
  • 결함처럼 보일 수 있는 정상 동작
  • 이 모델에 없는 것
  • 안전하게
  • 구조적 위험
  • FM-04, FM-15, FM-16.
  • FM-13.
  • FM-13, FM-16.

This preview shows only a portion of the complete repair manual. Purchase to access the full repair documentation, downloadable PDF and detailed repair procedures.

예상 근본 원인

  • Battery is empty, protected, or faulty
  • Pack is not latched or contacts are dirty
  • Lock-off or trigger travel is incomplete
  • Switch, wiring, or motor has failed
  • Gear or reciprocating drive is seized
  • Battery rails or socket contain debris
  • Pack shell, rails, or handle is distorted
  • Release button or latch is jammed
  • Wrong or unverified battery is used
  • Contact plate or housing is damaged
  • Outlet has no power or is switched off
  • Pack is not fully seated in charger
  • Pack is too hot or too cold to charge
  • Battery or charger contact is faulty
  • Charger cavity contains conductive debris
  • Battery charge or protection drops early
  • Battery or tool contact is intermittent
  • Lock-off, trigger, or wiring is faulty
  • Blade bind or excess pressure overloads saw
  • Motor or reciprocating drive has drag
  • Dry chips obstruct lever travel
  • Lever is forced against blade load
  • Lever, cam, pin, or spring is damaged
  • Front housing is impact-distorted
  • Internal clamp mechanism is corroded
  • Hot blade or pitch binds the shank
  • Blade shank is bent inside clamp
  • Chips are packed around the shank
  • Clamp jaw or slider is damaged
  • Blade was forced or installed crooked
  • Sawdust or pitch obstructs shoe pivot
  • Shoe is bent from impact or prying
  • Pivot pin, spring, or retainer is worn
  • Front housing or shoe mount is cracked
  • Blade or clamp rubs the shoe
  • Blade is dull, wrong, clogged, or reversed
  • Battery is weak, hot, or nearly empty
  • Blade is too long or poorly supported
  • Work is loose or the kerf is pinching
  • Motor, brush, or drive loses output
  • Blade is dull, wrong, too long, or damaged
  • Blade does not extend past work and shoe
  • Shoe is not held firmly against work
  • Feed is twisted, forced, or side-loaded
  • Work support allows vibration or pinch
  • Shoe is not held firmly on work
  • Work is loose or the kerf closes
  • Blade is dull, wrong, bent, or clogged
  • Feed starts before full motor speed
  • Hidden fastener or utility is struck
  • Trigger does not return fully
  • Battery or contact connection is unstable
  • Brake switching path is worn or faulty
  • Motor brushes or commutator are worn
  • Motor or drive has an internal fault
  • Blade is bent or not clamped securely
  • Shoe or clamp contacts the blade
  • Slider, bearing, gear, or crank is worn
  • Motor pinion or brushes are damaged
  • Housing or front assembly is misaligned
  • Blade is dull, binding, or being forced
  • Vents are blocked by dust or chips
  • Duty cycle or feed load is excessive
  • Battery or charger is hot or damaged
  • Motor, brushes, bearing, or drive drags
  • Battery is cracked, swollen, leaking, or wet
  • Charger cord, plug, or case is damaged
  • Liquid entered electrical or motor areas
  • Severe arcing, smoke, or burning is present
  • Housing, shoe, clamp, or handle has failed
  • Blade shank is wrong, bent, or burred
  • Clamp slot contains chips or pitch
  • Blade is not inserted from the front
  • Clamp jaws or slider are worn
  • Blade is too short for the planned cut
충전되고 래치된 battery와 정상적인 잠금 해제 및 트리거 명령에도 블레이드 스트로크가 발생하지 않습니다.

세부 정보 보기

공구 없는 블레이드 클램프 해제 레버가 완전히 열리거나 안전하게 닫히지 않음.

세부 정보 보기

블레이드가 절단선에서 벗어나거나 과도하게 휘거나 구부러지거나 파손됨.

세부 정보 보기

클램프 레버가 작동하지만 올바른 블레이드가 완전히 삽입되지 않거나 손으로 당겼을 때 고정되지 않음.

세부 정보 보기

battery가 완전히 삽입되지 않거나, 제자리에 클릭되지 않거나, 유지되지 않거나, 정상적으로 해제되지 않음.

세부 정보 보기

작동 중인 톱이 작업물에 대해 점프, 진동, 걸림 또는 뒤로/옆으로 반동함.

세부 정보 보기

클램프 레버는 정상적으로 열리지만 설치된 블레이드가 앞 클램프에 갇혀 있음.

세부 정보 보기

클램프 레버가 움직이지 않음

세부 정보 보기

충전기가 충전을 시작하거나 완료하지 않거나 녹색 표시등이 정상적으로 작동하지 않음.

세부 정보 보기

트리거를 놓은 후 블레이드가 정상보다 눈에 띄게 더 오래 스트로크를 계속함.

세부 정보 보기

블레이드가 고정되지 않음

세부 정보 보기

슈가 느슨하거나 휨

세부 정보 보기

슈가 자유롭게 피벗되지 않거나 휘거나 느슨하며 작업물에 단단히 밀착되지 않음.

세부 정보 보기

안전한 정상 블레이드가 작업물과 간섭 없이 있을 때 톱에서 거친 소리, 걸림 또는 진동 발생.

세부 정보 보기

냉각된 톱이 무부하 테스트 또는 가벼운 절단 중에 시작했다가 열이 쌓이기 전에 멈춤.

세부 정보 보기

블레이드가 일정하게 스트로크하지만 절단 속도가 느리거나 쉽게 멈추며 과도한 공급력이 필요함.

세부 정보 보기

톱, battery 또는 충전기가 비정상적으로 뜨거워지거나 가열 후 반복적으로 꺼짐

세부 정보 보기

연기, 불꽃, 액체, 부풀음, 누출, 타는 냄새, 노출된 부품 또는 균열된 구조가 있음

세부 정보 보기

요약

충전되고 걸린 battery와 정상적인 잠금 해제 및 트리거 작동에도 불구하고 톱이 블레이드 스트로크 반응을 전혀 보이지 않습니다.

Full repair guide includes

  • Root Cause Analysis
  • Required Tools
  • Replacement Parts
  • Step-by-step Repair Procedure
  • Safety Precautions
  • Verification Checklist

요약

battery가 톱에 완전히 삽입되지 않거나 걸리지 않으며 정상적으로 유지되거나 해제되지 않습니다.

Full repair guide includes

  • Root Cause Analysis
  • Required Tools
  • Replacement Parts
  • Step-by-step Repair Procedure
  • Safety Precautions
  • Verification Checklist

Full repair guide includes

  • Root Cause Analysis
  • Required Tools
  • Replacement Parts
  • Step-by-step Repair Procedure
  • Safety Precautions
  • Verification Checklist

Full repair guide includes

  • Root Cause Analysis
  • Required Tools
  • Replacement Parts
  • Step-by-step Repair Procedure
  • Safety Precautions
  • Verification Checklist

요약

battery를 제거하고 제어 순환을 중지하십시오.

Full repair guide includes

  • Root Cause Analysis
  • Required Tools
  • Replacement Parts
  • Step-by-step Repair Procedure
  • Safety Precautions
  • Verification Checklist

요약

공구 없는 블레이드 클램프 레버가 완전히 열리거나 닫히지 않아 블레이드 교체 또는 안전한 고정이 불가능합니다.

Full repair guide includes

  • Root Cause Analysis
  • Required Tools
  • Replacement Parts
  • Step-by-step Repair Procedure
  • Safety Precautions
  • Verification Checklist

요약

클램프 레버는 정상적으로 열리지만 설치된 블레이드가 앞 클램프에 갇혀 해제되지 않습니다.

Full repair guide includes

  • Root Cause Analysis
  • Required Tools
  • Replacement Parts
  • Step-by-step Repair Procedure
  • Safety Precautions
  • Verification Checklist

요약

피벗 슈가 휘어졌거나 느슨하며 자유롭게 피벗되지 않거나 작업물에 단단히 밀착되지 않습니다.

Full repair guide includes

  • Root Cause Analysis
  • Required Tools
  • Replacement Parts
  • Step-by-step Repair Procedure
  • Safety Precautions
  • Verification Checklist

요약

블레이드가 꾸준히 스트로크하지만 절단 속도가 느리거나 쉽게 멈추거나 과도한 공급 힘이 필요합니다.

Full repair guide includes

  • Root Cause Analysis
  • Required Tools
  • Replacement Parts
  • Step-by-step Repair Procedure
  • Safety Precautions
  • Verification Checklist

요약

블레이드가 정상 절단 중에 절단선에서 벗어나거나 과도하게 휘거나 구부러지거나 부러집니다.

Full repair guide includes

  • Root Cause Analysis
  • Required Tools
  • Replacement Parts
  • Step-by-step Repair Procedure
  • Safety Precautions
  • Verification Checklist

Full repair guide includes

  • Root Cause Analysis
  • Required Tools
  • Replacement Parts
  • Step-by-step Repair Procedure
  • Safety Precautions
  • Verification Checklist

요약

트리거를 놓은 후에도 블레이드가 정상보다 눈에 띄게 더 오래 스트로크를 계속하여 전기 브레이크가 블레이드를 즉시 멈추지 못함을 나타냅니다.

Full repair guide includes

  • Root Cause Analysis
  • Required Tools
  • Replacement Parts
  • Step-by-step Repair Procedure
  • Safety Precautions
  • Verification Checklist

Full repair guide includes

  • Root Cause Analysis
  • Required Tools
  • Replacement Parts
  • Step-by-step Repair Procedure
  • Safety Precautions
  • Verification Checklist

요약

도구, battery 또는 충전기가 비정상적으로 뜨거워지거나 가열 후 반복적으로 종료됩니다.

Full repair guide includes

  • Root Cause Analysis
  • Required Tools
  • Replacement Parts
  • Step-by-step Repair Procedure
  • Safety Precautions
  • Verification Checklist

요약

연기, 불꽃, 액체 누출, 팽창, 타는 냄새, 노출된 부품 또는 균열된 구조 부품이 있어 즉각적인 위험이 존재합니다.

Full repair guide includes

  • Root Cause Analysis
  • Required Tools
  • Replacement Parts
  • Step-by-step Repair Procedure
  • Safety Precautions
  • Verification Checklist

Full repair guide includes

  • Root Cause Analysis
  • Required Tools
  • Replacement Parts
  • Step-by-step Repair Procedure
  • Safety Precautions
  • Verification Checklist

요약

1. 즉시 battery을 제거하고 조작을 중단하십시오.

Full repair guide includes

  • Root Cause Analysis
  • Required Tools
  • Replacement Parts
  • Step-by-step Repair Procedure
  • Safety Precautions
  • Verification Checklist

FixBeforeBuy

Trusted repair guides, error codes, symptoms, and manuals before you replace your equipment.

Navigation

For technicians

Need the full step-by-step manual? Purchase securely on FixBeforeBuy and download your PDF after Stripe payment.

© 2026 FixBeforeBuy. Repair smarter before you buy.