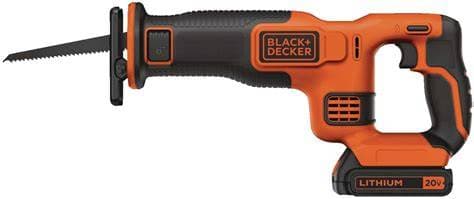

Category: Power Tools

Brand: BLACK+DECKER

Model: BDCR20C

BLACK+DECKER BDCR20C Repair Manual

Owner-level repair manual for the BLACK+DECKER BDCR20C 20V MAX reciprocating saw, including troubleshooting, parts identification, safety guidance, and step-by-step repair instructions.

$39.99

Last updated Jul 31, 2026, 11:06 AM

Manual information

About this manual

Owner-level repair manual for the BLACK+DECKER BDCR20C 20V MAX reciprocating saw, including troubleshooting, parts identification, safety guidance, and step-by-step repair instructions.

0% Reported Successful Repair

Price

$39.99

Full Manual Includes

  • root cause analysis
  • tools needed
  • step-by-step repair procedure
  • diagrams
  • exploded views
  • post-repair checks

Table of contents preview

  • BLACK+DECKER BDCR20C 20V MAX* RECIPROCATING SAW
  • Black+decker Bdcr20c
  • The Six Things That Matter Most
  • What This Model Actually Has
  • Indicator And Signal Map
  • Model-revision Warning
  • The Power And Cutting Path
  • Normal Use Sequence
  • Normal Behavior That Can Look Like A Fault
  • What This Model Does Not Have
  • Safely
  • Pivot
  • Structural Hazard
  • FM-04, FM-15, FM-16.
  • Fm-13.

This preview shows only a portion of the complete repair manual. Purchase to access the full repair documentation, downloadable PDF and detailed repair procedures.

Likely Root Causes

  • Battery is empty, protected, or faulty
  • Pack is not latched or contacts are dirty
  • Lock-off or trigger travel is incomplete
  • Switch, wiring, or motor has failed
  • Gear or reciprocating drive is seized
  • Battery rails or socket contain debris
  • Pack shell, rails, or handle is distorted
  • Release button or latch is jammed
  • Wrong or unverified battery is used
  • Contact plate or housing is damaged
  • Outlet has no power or is switched off
  • Pack is not fully seated in charger
  • Pack is too hot or too cold to charge
  • Battery or charger contact is faulty
  • Charger cavity contains conductive debris
  • Battery charge or protection drops early
  • Battery or tool contact is intermittent
  • Lock-off, trigger, or wiring is faulty
  • Blade bind or excess pressure overloads saw
  • Motor or reciprocating drive has drag
  • Dry chips obstruct lever travel
  • Lever is forced against blade load
  • Lever, cam, pin, or spring is damaged
  • Front housing is impact-distorted
  • Internal clamp mechanism is corroded
  • Hot blade or pitch binds the shank
  • Blade shank is bent inside clamp
  • Chips are packed around the shank
  • Clamp jaw or slider is damaged
  • Blade was forced or installed crooked
  • Sawdust or pitch obstructs shoe pivot
  • Shoe is bent from impact or prying
  • Pivot pin, spring, or retainer is worn
  • Front housing or shoe mount is cracked
  • Blade or clamp rubs the shoe
  • Blade is dull, wrong, clogged, or reversed
  • Battery is weak, hot, or nearly empty
  • Blade is too long or poorly supported
  • Work is loose or the kerf is pinching
  • Motor, brush, or drive loses output
  • Blade is dull, wrong, too long, or damaged
  • Blade does not extend past work and shoe
  • Shoe is not held firmly against work
  • Feed is twisted, forced, or side-loaded
  • Work support allows vibration or pinch
  • Shoe is not held firmly on work
  • Work is loose or the kerf closes
  • Blade is dull, wrong, bent, or clogged
  • Feed starts before full motor speed
  • Hidden fastener or utility is struck
  • Trigger does not return fully
  • Battery or contact connection is unstable
  • Brake switching path is worn or faulty
  • Motor brushes or commutator are worn
  • Motor or drive has an internal fault
  • Blade is bent or not clamped securely
  • Shoe or clamp contacts the blade
  • Slider, bearing, gear, or crank is worn
  • Motor pinion or brushes are damaged
  • Housing or front assembly is misaligned
  • Blade is dull, binding, or being forced
  • Vents are blocked by dust or chips
  • Duty cycle or feed load is excessive
  • Battery or charger is hot or damaged
  • Motor, brushes, bearing, or drive drags
  • Battery is cracked, swollen, leaking, or wet
  • Charger cord, plug, or case is damaged
  • Liquid entered electrical or motor areas
  • Severe arcing, smoke, or burning is present
  • Housing, shoe, clamp, or handle has failed
  • Blade shank is wrong, bent, or burred
  • Clamp slot contains chips or pitch
  • Blade is not inserted from the front
  • Clamp jaws or slider are worn
  • Blade is too short for the planned cut
A charged, latched battery and normal lock-off and trigger command produce no blade stroke.

View details

The tool-free blade-clamp release lever will not reach full open or close securely.

View details

The blade leaves the line, flexes excessively, bends, or breaks during an otherwise controlled cut.

View details

With the clamp lever working, a correct blade will not enter fully or fails the hand tug-check.

View details

The battery will not insert fully, click into place, remain retained, or release normally.

View details

The running saw jumps, vibrates against the work, snags, or kicks backward or sideways.

View details

The clamp lever opens normally, but the installed blade remains trapped in the front clamp.

View details

Clamp lever will not travel

View details

The charger will not begin or complete charging, or its green light does not behave normally.

View details

After the trigger is released, the blade keeps stroking noticeably longer than normal.

View details

Blade will not stay clamped

View details

Shoe is loose or bent

View details

The shoe will not pivot freely, is bent or loose, or will not sit firmly against the work.

View details

With a secure known-good blade clear of the work, the saw has harsh sound, bind, or vibration.

View details

The cool saw starts, then stops during a brief no-load test or light cut before heat builds.

View details

The blade strokes steadily but cuts slowly, stalls easily, or needs excessive feed force.

View details

The saw, battery, or charger becomes abnormally hot or repeatedly shuts down after warming.

View details

Smoke, sparks, liquid, swelling, leakage, burning odor, exposed parts, or cracked structure is present.

View details

Summary

The saw produces no blade stroke response despite a charged, latched battery and normal lock-off and trigger operation.

Full repair guide includes

  • Root Cause Analysis
  • Required Tools
  • Replacement Parts
  • Step-by-step Repair Procedure
  • Safety Precautions
  • Verification Checklist

Summary

The battery will not fully insert, latch, remain retained, or release normally in the saw.

Full repair guide includes

  • Root Cause Analysis
  • Required Tools
  • Replacement Parts
  • Step-by-step Repair Procedure
  • Safety Precautions
  • Verification Checklist

Full repair guide includes

  • Root Cause Analysis
  • Required Tools
  • Replacement Parts
  • Step-by-step Repair Procedure
  • Safety Precautions
  • Verification Checklist

Full repair guide includes

  • Root Cause Analysis
  • Required Tools
  • Replacement Parts
  • Step-by-step Repair Procedure
  • Safety Precautions
  • Verification Checklist

Summary

Remove the battery and stop cycling the controls.

Full repair guide includes

  • Root Cause Analysis
  • Required Tools
  • Replacement Parts
  • Step-by-step Repair Procedure
  • Safety Precautions
  • Verification Checklist

Summary

The tool-free blade-clamp lever will not open or close fully, preventing blade changes or secure clamping.

Full repair guide includes

  • Root Cause Analysis
  • Required Tools
  • Replacement Parts
  • Step-by-step Repair Procedure
  • Safety Precautions
  • Verification Checklist

Summary

The clamp lever opens normally, but the installed blade remains trapped and will not release from the front clamp.

Full repair guide includes

  • Root Cause Analysis
  • Required Tools
  • Replacement Parts
  • Step-by-step Repair Procedure
  • Safety Precautions
  • Verification Checklist

Summary

The pivoting shoe is bent, loose, will not pivot freely, or does not sit firmly against the workpiece.

Full repair guide includes

  • Root Cause Analysis
  • Required Tools
  • Replacement Parts
  • Step-by-step Repair Procedure
  • Safety Precautions
  • Verification Checklist

Summary

The blade strokes steadily but cuts slowly, stalls easily, or requires excessive feed force.

Full repair guide includes

  • Root Cause Analysis
  • Required Tools
  • Replacement Parts
  • Step-by-step Repair Procedure
  • Safety Precautions
  • Verification Checklist

Summary

The blade wanders off the cut line, flexes excessively, bends, or breaks during normal cutting.

Full repair guide includes

  • Root Cause Analysis
  • Required Tools
  • Replacement Parts
  • Step-by-step Repair Procedure
  • Safety Precautions
  • Verification Checklist

Full repair guide includes

  • Root Cause Analysis
  • Required Tools
  • Replacement Parts
  • Step-by-step Repair Procedure
  • Safety Precautions
  • Verification Checklist

Summary

After releasing the trigger, the blade continues to stroke noticeably longer than normal, indicating the electric brake is not stopping the blade promptly.

Full repair guide includes

  • Root Cause Analysis
  • Required Tools
  • Replacement Parts
  • Step-by-step Repair Procedure
  • Safety Precautions
  • Verification Checklist

Full repair guide includes

  • Root Cause Analysis
  • Required Tools
  • Replacement Parts
  • Step-by-step Repair Procedure
  • Safety Precautions
  • Verification Checklist

Summary

The tool, battery, or charger becomes abnormally hot or repeatedly shuts down after warming.

Full repair guide includes

  • Root Cause Analysis
  • Required Tools
  • Replacement Parts
  • Step-by-step Repair Procedure
  • Safety Precautions
  • Verification Checklist

Summary

Presence of smoke, sparks, liquid leakage, swelling, burning odor, exposed parts, or cracked structural components indicating immediate hazard.

Full repair guide includes

  • Root Cause Analysis
  • Required Tools
  • Replacement Parts
  • Step-by-step Repair Procedure
  • Safety Precautions
  • Verification Checklist

Full repair guide includes

  • Root Cause Analysis
  • Required Tools
  • Replacement Parts
  • Step-by-step Repair Procedure
  • Safety Precautions
  • Verification Checklist

Summary

1. Remove battery immediately; stop cycling the controls.

Full repair guide includes

  • Root Cause Analysis
  • Required Tools
  • Replacement Parts
  • Step-by-step Repair Procedure
  • Safety Precautions
  • Verification Checklist

FixBeforeBuy

Trusted repair guides, error codes, symptoms, and manuals before you replace your equipment.

Navigation

For technicians

Need the full step-by-step manual? Purchase securely on FixBeforeBuy and download your PDF after Stripe payment.

© 2026 FixBeforeBuy. Repair smarter before you buy.