
カテゴリー: Power Tools

ブランド: BLACK+DECKER

モデル: BDCR20C

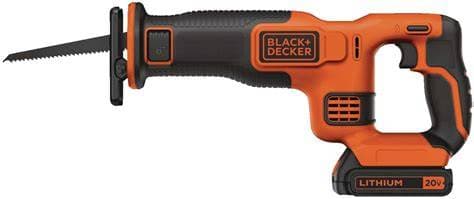
BLACK+DECKER BDCR20C 修理マニュアル

BLACK+DECKER BDCR20C 20V MAX 往復鋸の包括的な修理ガイド。トラブルシューティング、部品識別、安全アドバイス、16の一般的な故障モードに対するDIY修理手順を含みます。

$39.99

最終更新日 Jul 31, 2026, 11:06 AM

Manual information

このマニュアルについて

BLACK+DECKER BDCR20C 20V MAX 往復鋸の包括的な修理ガイド。トラブルシューティング、部品識別、安全アドバイス、16の一般的な故障モードに対するDIY修理手順を含みます。

0% Reported Successful Repair

Price

$39.99

完全版マニュアルの内容

  • root cause analysis
  • tools needed
  • step-by-step repair procedure
  • diagrams
  • exploded views
  • post-repair checks

目次プレビュー

  • BLACK+DECKER BDCR20C 20V MAX* レシプロソー
  • Black+decker Bdcr20c
  • 最も重要な6つのこと
  • このモデルの実際の特徴
  • インジケーターと信号マップ
  • モデル改訂警告
  • パワーと切断経路
  • 通常の使用手順
  • 故障のように見える正常動作
  • このモデルにないもの
  • 安全に
  • ピボット
  • 構造的危険
  • FM-04、FM-15、FM-16。
  • Fm-13。

This preview shows only a portion of the complete repair manual. Purchase to access the full repair documentation, downloadable PDF and detailed repair procedures.

考えられる根本原因

  • Battery is empty, protected, or faulty
  • Pack is not latched or contacts are dirty
  • Lock-off or trigger travel is incomplete
  • Switch, wiring, or motor has failed
  • Gear or reciprocating drive is seized
  • Battery rails or socket contain debris
  • Pack shell, rails, or handle is distorted
  • Release button or latch is jammed
  • Wrong or unverified battery is used
  • Contact plate or housing is damaged
  • Outlet has no power or is switched off
  • Pack is not fully seated in charger
  • Pack is too hot or too cold to charge
  • Battery or charger contact is faulty
  • Charger cavity contains conductive debris
  • Battery charge or protection drops early
  • Battery or tool contact is intermittent
  • Lock-off, trigger, or wiring is faulty
  • Blade bind or excess pressure overloads saw
  • Motor or reciprocating drive has drag
  • Dry chips obstruct lever travel
  • Lever is forced against blade load
  • Lever, cam, pin, or spring is damaged
  • Front housing is impact-distorted
  • Internal clamp mechanism is corroded
  • Hot blade or pitch binds the shank
  • Blade shank is bent inside clamp
  • Chips are packed around the shank
  • Clamp jaw or slider is damaged
  • Blade was forced or installed crooked
  • Sawdust or pitch obstructs shoe pivot
  • Shoe is bent from impact or prying
  • Pivot pin, spring, or retainer is worn
  • Front housing or shoe mount is cracked
  • Blade or clamp rubs the shoe
  • Blade is dull, wrong, clogged, or reversed
  • Battery is weak, hot, or nearly empty
  • Blade is too long or poorly supported
  • Work is loose or the kerf is pinching
  • Motor, brush, or drive loses output
  • Blade is dull, wrong, too long, or damaged
  • Blade does not extend past work and shoe
  • Shoe is not held firmly against work
  • Feed is twisted, forced, or side-loaded
  • Work support allows vibration or pinch
  • Shoe is not held firmly on work
  • Work is loose or the kerf closes
  • Blade is dull, wrong, bent, or clogged
  • Feed starts before full motor speed
  • Hidden fastener or utility is struck
  • Trigger does not return fully
  • Battery or contact connection is unstable
  • Brake switching path is worn or faulty
  • Motor brushes or commutator are worn
  • Motor or drive has an internal fault
  • Blade is bent or not clamped securely
  • Shoe or clamp contacts the blade
  • Slider, bearing, gear, or crank is worn
  • Motor pinion or brushes are damaged
  • Housing or front assembly is misaligned
  • Blade is dull, binding, or being forced
  • Vents are blocked by dust or chips
  • Duty cycle or feed load is excessive
  • Battery or charger is hot or damaged
  • Motor, brushes, bearing, or drive drags
  • Battery is cracked, swollen, leaking, or wet
  • Charger cord, plug, or case is damaged
  • Liquid entered electrical or motor areas
  • Severe arcing, smoke, or burning is present
  • Housing, shoe, clamp, or handle has failed
  • Blade shank is wrong, bent, or burred
  • Clamp slot contains chips or pitch
  • Blade is not inserted from the front
  • Clamp jaws or slider are worn
  • Blade is too short for the planned cut
充電され、ラッチされたbatteryと正常なロックオフおよびトリガーコマンドがブレードストロークを生じない。

詳細を見る

工具不要のブレードクランプリリースレバーが完全に開かず安全に閉じない。

詳細を見る

ブレードが切断線から外れ、過度にたわみ、曲がったり折れたりする。

詳細を見る

クランプレバーが正常でも、正しいブレードが完全に挿入されず手で引くチェックに失敗する。

詳細を見る

batteryが完全に挿入されず、カチッと固定されず、保持されず、正常にリリースされない。

詳細を見る

動作中のノコギリが作業物に対してジャンプ、振動、引っかかり、後方または横方向にキックする。

詳細を見る

クランプレバーは正常に開くが、装着されたブレードが前部クランプに閉じ込められたまま。

詳細を見る

クランプレバーが動かない

詳細を見る

充電器が充電を開始または完了せず、緑色のライトが正常に動作しない。

詳細を見る

トリガーを離した後、ブレードが通常より明らかに長くストロークし続ける。

詳細を見る

ブレードが固定されない

詳細を見る

シューが緩んでいるか曲がっている

詳細を見る

シューが自由に回転せず、曲がっているか緩んでいるか、作業物にしっかり接触しない。

詳細を見る

作業物から離れた安全な良好な刃を装着した状態で、ノコギリが激しい音、引っかかり、または振動を起こす。

詳細を見る

冷えた状態でソーが始動し、短時間の無負荷テストや軽い切断中に停止する。

詳細を見る

刃は安定して動くが、切断が遅く、簡単に停止しやすいか、過度の送り力が必要。

詳細を見る

ソー、battery、または充電器が異常に熱くなるか、温まった後に繰り返しシャットダウンする。

詳細を見る

煙、火花、液体、膨張、漏れ、焦げ臭い匂い、露出部品、または亀裂のある構造が存在する。

詳細を見る

概要

充電されたbatteryと正常なトリガー操作にもかかわらず、鋸がブレードストロークを発生しません。

Full repair guide includes

  • Root Cause Analysis
  • Required Tools
  • Replacement Parts
  • Step-by-step Repair Procedure
  • Safety Precautions
  • Verification Checklist

概要

batteryが鋸に完全に挿入されず、ラッチされず、保持されず、正常にリリースされません。

Full repair guide includes

  • Root Cause Analysis
  • Required Tools
  • Replacement Parts
  • Step-by-step Repair Procedure
  • Safety Precautions
  • Verification Checklist

概要

充電器が充電を開始または完了せず、充電器の緑色ランプが正常に動作しません。

Full repair guide includes

  • Root Cause Analysis
  • Required Tools
  • Replacement Parts
  • Step-by-step Repair Procedure
  • Safety Precautions
  • Verification Checklist

Full repair guide includes

  • Root Cause Analysis
  • Required Tools
  • Replacement Parts
  • Step-by-step Repair Procedure
  • Safety Precautions
  • Verification Checklist

概要

batteryを取り外し、コントロールのサイクルを停止する。

Full repair guide includes

  • Root Cause Analysis
  • Required Tools
  • Replacement Parts
  • Step-by-step Repair Procedure
  • Safety Precautions
  • Verification Checklist

概要

工具不要のブレードクランプレバーが完全に開閉せず、ブレードの交換や確実なクランプができません。

Full repair guide includes

  • Root Cause Analysis
  • Required Tools
  • Replacement Parts
  • Step-by-step Repair Procedure
  • Safety Precautions
  • Verification Checklist

概要

クランプレバーは正常に開きますが、装着されたブレードが前部クランプに閉じ込められ、リリースされません。

Full repair guide includes

  • Root Cause Analysis
  • Required Tools
  • Replacement Parts
  • Step-by-step Repair Procedure
  • Safety Precautions
  • Verification Checklist

概要

ピボット式シューが曲がっている、緩んでいる、自由に回転しない、または作業物にしっかり接していません。

Full repair guide includes

  • Root Cause Analysis
  • Required Tools
  • Replacement Parts
  • Step-by-step Repair Procedure
  • Safety Precautions
  • Verification Checklist

概要

ソー、battery、または充電器が異常に熱くなるか、温まった後に繰り返しシャットダウンする。

Full repair guide includes

  • Root Cause Analysis
  • Required Tools
  • Replacement Parts
  • Step-by-step Repair Procedure
  • Safety Precautions
  • Verification Checklist

概要

使用中にブレードが切断線から逸れたり、過度にしなったり、曲がったり、破損したりします。

Full repair guide includes

  • Root Cause Analysis
  • Required Tools
  • Replacement Parts
  • Step-by-step Repair Procedure
  • Safety Precautions
  • Verification Checklist

Full repair guide includes

  • Root Cause Analysis
  • Required Tools
  • Replacement Parts
  • Step-by-step Repair Procedure
  • Safety Precautions
  • Verification Checklist

概要

トリガーを離した後、ブレードが通常より明らかに長くストロークし続け、迅速に停止しません。

Full repair guide includes

  • Root Cause Analysis
  • Required Tools
  • Replacement Parts
  • Step-by-step Repair Procedure
  • Safety Precautions
  • Verification Checklist

Full repair guide includes

  • Root Cause Analysis
  • Required Tools
  • Replacement Parts
  • Step-by-step Repair Procedure
  • Safety Precautions
  • Verification Checklist

Full repair guide includes

  • Root Cause Analysis
  • Required Tools
  • Replacement Parts
  • Step-by-step Repair Procedure
  • Safety Precautions
  • Verification Checklist

概要

煙、火花、液漏れ、膨張、焦げ臭、露出部品、ひび割れ構造などの即時危険状態が存在します。

Full repair guide includes

  • Root Cause Analysis
  • Required Tools
  • Replacement Parts
  • Step-by-step Repair Procedure
  • Safety Precautions
  • Verification Checklist

Full repair guide includes

  • Root Cause Analysis
  • Required Tools
  • Replacement Parts
  • Step-by-step Repair Procedure
  • Safety Precautions
  • Verification Checklist

概要

1. 直ちにbatteryを取り外し、コントロールの操作を停止。

Full repair guide includes

  • Root Cause Analysis
  • Required Tools
  • Replacement Parts
  • Step-by-step Repair Procedure
  • Safety Precautions
  • Verification Checklist

FixBeforeBuy

Trusted repair guides, error codes, symptoms, and manuals before you replace your equipment.

Navigation

For technicians

Need the full step-by-step manual? Purchase securely on FixBeforeBuy and download your PDF after Stripe payment.

© 2026 FixBeforeBuy. Repair smarter before you buy.