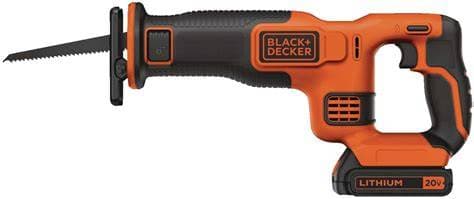

دليل إصلاح BLACK+DECKER BDCR20C
دليل إصلاح على مستوى المالك لمنشار الترددي BLACK+DECKER BDCR20C 20V MAX، يشمل استكشاف الأخطاء، تحديد الأجزاء، إرشادات السلامة، وتعليمات الإصلاح خطوة بخطوة.
$39.99
آخر تحديث Jul 31, 2026, 11:06 AM
Manual information
حول هذا الدليل
دليل إصلاح على مستوى المالك لمنشار الترددي BLACK+DECKER BDCR20C 20V MAX، يشمل استكشاف الأخطاء، تحديد الأجزاء، إرشادات السلامة، وتعليمات الإصلاح خطوة بخطوة.
0% Reported Successful Repair
$39.99
يتضمن الدليل الكامل
- root cause analysis
- tools needed
- step-by-step repair procedure
- diagrams
- exploded views
- post-repair checks
معاينة جدول المحتويات
- منشار ترددي BLACK+DECKER BDCR20C بقدرة 20V MAX*
- Black+decker Bdcr20c
- الأشياء الستة الأكثر أهمية
- ما يحتويه هذا النموذج فعليًا
- خريطة المؤشرات والإشارات
- تحذير مراجعة النموذج
- الطاقة ومسار القطع
- تسلسل الاستخدام العادي
- السلوك العادي الذي قد يبدو كعطل
- ما لا يحتويه هذا النموذج
- بأمان
- المحور
- خطر هيكلي
- FM-04، FM-15، FM-16.
- Fm-13.
This preview shows only a portion of the complete repair manual. Purchase to access the full repair documentation, downloadable PDF and detailed repair procedures.
الأسباب الجذرية المحتملة
- Battery is empty, protected, or faulty
- Pack is not latched or contacts are dirty
- Lock-off or trigger travel is incomplete
- Switch, wiring, or motor has failed
- Gear or reciprocating drive is seized
- Battery rails or socket contain debris
- Pack shell, rails, or handle is distorted
- Release button or latch is jammed
- Wrong or unverified battery is used
- Contact plate or housing is damaged
- Outlet has no power or is switched off
- Pack is not fully seated in charger
- Pack is too hot or too cold to charge
- Battery or charger contact is faulty
- Charger cavity contains conductive debris
- Battery charge or protection drops early
- Battery or tool contact is intermittent
- Lock-off, trigger, or wiring is faulty
- Blade bind or excess pressure overloads saw
- Motor or reciprocating drive has drag
- Dry chips obstruct lever travel
- Lever is forced against blade load
- Lever, cam, pin, or spring is damaged
- Front housing is impact-distorted
- Internal clamp mechanism is corroded
- Hot blade or pitch binds the shank
- Blade shank is bent inside clamp
- Chips are packed around the shank
- Clamp jaw or slider is damaged
- Blade was forced or installed crooked
- Sawdust or pitch obstructs shoe pivot
- Shoe is bent from impact or prying
- Pivot pin, spring, or retainer is worn
- Front housing or shoe mount is cracked
- Blade or clamp rubs the shoe
- Blade is dull, wrong, clogged, or reversed
- Battery is weak, hot, or nearly empty
- Blade is too long or poorly supported
- Work is loose or the kerf is pinching
- Motor, brush, or drive loses output
- Blade is dull, wrong, too long, or damaged
- Blade does not extend past work and shoe
- Shoe is not held firmly against work
- Feed is twisted, forced, or side-loaded
- Work support allows vibration or pinch
- Shoe is not held firmly on work
- Work is loose or the kerf closes
- Blade is dull, wrong, bent, or clogged
- Feed starts before full motor speed
- Hidden fastener or utility is struck
- Trigger does not return fully
- Battery or contact connection is unstable
- Brake switching path is worn or faulty
- Motor brushes or commutator are worn
- Motor or drive has an internal fault
- Blade is bent or not clamped securely
- Shoe or clamp contacts the blade
- Slider, bearing, gear, or crank is worn
- Motor pinion or brushes are damaged
- Housing or front assembly is misaligned
- Blade is dull, binding, or being forced
- Vents are blocked by dust or chips
- Duty cycle or feed load is excessive
- Battery or charger is hot or damaged
- Motor, brushes, bearing, or drive drags
- Battery is cracked, swollen, leaking, or wet
- Charger cord, plug, or case is damaged
- Liquid entered electrical or motor areas
- Severe arcing, smoke, or burning is present
- Housing, shoe, clamp, or handle has failed
- Blade shank is wrong, bent, or burred
- Clamp slot contains chips or pitch
- Blade is not inserted from the front
- Clamp jaws or slider are worn
- Blade is too short for the planned cut
الموديل المدعوم
موديلات ذات صلة
أعراض شائعة
عرض التفاصيل
عرض التفاصيل
عرض التفاصيل
عرض التفاصيل
عرض التفاصيل
عرض التفاصيل
عرض التفاصيل
عرض التفاصيل
عرض التفاصيل
عرض التفاصيل
عرض التفاصيل
عرض التفاصيل
عرض التفاصيل
عرض التفاصيل
عرض التفاصيل
عرض التفاصيل
عرض التفاصيل
عرض التفاصيل
أوضاع الأعطال
الملخص
لا يستجيب المنشار لضربة الشفرة رغم وجود battery مشحون ومثبت وعملية قفل وزناد طبيعية.
Full repair guide includes
- Root Cause Analysis
- Required Tools
- Replacement Parts
- Step-by-step Repair Procedure
- Safety Precautions
- Verification Checklist
الملخص
لا يتم إدخال battery بالكامل، أو لا يتم تثبيته، أو لا يبقى مثبتًا، أو لا يُفرج عنه بشكل طبيعي في المنشار.
Full repair guide includes
- Root Cause Analysis
- Required Tools
- Replacement Parts
- Step-by-step Repair Procedure
- Safety Precautions
- Verification Checklist
Full repair guide includes
- Root Cause Analysis
- Required Tools
- Replacement Parts
- Step-by-step Repair Procedure
- Safety Precautions
- Verification Checklist
Full repair guide includes
- Root Cause Analysis
- Required Tools
- Replacement Parts
- Step-by-step Repair Procedure
- Safety Precautions
- Verification Checklist
الملخص
أزل battery وتوقف عن تشغيل الضوابط.
Full repair guide includes
- Root Cause Analysis
- Required Tools
- Replacement Parts
- Step-by-step Repair Procedure
- Safety Precautions
- Verification Checklist
الملخص
ذراع مشبك الشفرة بدون أدوات لا يفتح أو يغلق بالكامل، مما يمنع تغيير الشفرة أو التثبيت الآمن.
Full repair guide includes
- Root Cause Analysis
- Required Tools
- Replacement Parts
- Step-by-step Repair Procedure
- Safety Precautions
- Verification Checklist
الملخص
يفتح ذراع المشبك بشكل طبيعي، لكن الشفرة المثبتة تبقى محاصرة ولا تُفرج من المشبك الأمامي.
Full repair guide includes
- Root Cause Analysis
- Required Tools
- Replacement Parts
- Step-by-step Repair Procedure
- Safety Precautions
- Verification Checklist
الملخص
الحذاء الدوار منحني، مرتخي، لا يدور بحرية، أو لا يجلس بإحكام على قطعة العمل.
Full repair guide includes
- Root Cause Analysis
- Required Tools
- Replacement Parts
- Step-by-step Repair Procedure
- Safety Precautions
- Verification Checklist
الملخص
تتحرك الشفرة بثبات لكنها تقطع ببطء، تتوقف بسهولة، أو تتطلب قوة تغذية مفرطة.
Full repair guide includes
- Root Cause Analysis
- Required Tools
- Replacement Parts
- Step-by-step Repair Procedure
- Safety Precautions
- Verification Checklist
الملخص
تتجول الشفرة عن خط القطع، تنثني بشكل مفرط، تنحني، أو تنكسر أثناء القطع العادي.
Full repair guide includes
- Root Cause Analysis
- Required Tools
- Replacement Parts
- Step-by-step Repair Procedure
- Safety Precautions
- Verification Checklist
Full repair guide includes
- Root Cause Analysis
- Required Tools
- Replacement Parts
- Step-by-step Repair Procedure
- Safety Precautions
- Verification Checklist
الملخص
بعد تحرير الزناد، تستمر الشفرة في الضرب لفترة أطول من المعتاد، مما يشير إلى أن الفرامل الكهربائية لا توقف الشفرة بسرعة.
Full repair guide includes
- Root Cause Analysis
- Required Tools
- Replacement Parts
- Step-by-step Repair Procedure
- Safety Precautions
- Verification Checklist
Full repair guide includes
- Root Cause Analysis
- Required Tools
- Replacement Parts
- Step-by-step Repair Procedure
- Safety Precautions
- Verification Checklist
الملخص
تصبح الأداة، battery، أو الشاحن ساخنة بشكل غير طبيعي أو تغلق بشكل متكرر بعد التسخين.
Full repair guide includes
- Root Cause Analysis
- Required Tools
- Replacement Parts
- Step-by-step Repair Procedure
- Safety Precautions
- Verification Checklist
الملخص
وجود دخان، شرر، تسرب سائل، انتفاخ، رائحة حرق، أجزاء مكشوفة، أو مكونات هيكلية متشققة تشير إلى خطر فوري.
Full repair guide includes
- Root Cause Analysis
- Required Tools
- Replacement Parts
- Step-by-step Repair Procedure
- Safety Precautions
- Verification Checklist
Full repair guide includes
- Root Cause Analysis
- Required Tools
- Replacement Parts
- Step-by-step Repair Procedure
- Safety Precautions
- Verification Checklist
الملخص
1. أزل battery فورًا؛ توقف عن تشغيل الضوابط.
Full repair guide includes
- Root Cause Analysis
- Required Tools
- Replacement Parts
- Step-by-step Repair Procedure
- Safety Precautions
- Verification Checklist